Appearance
Contracts
Create, send, and collect digital signatures on contracts — sales agreements, layaway terms, alteration authorizations, or any custom document. Contracts can be sent to customers for remote signing or signed on the spot at the POS during checkout.
Contract List
| Column | Description |
|---|---|
| Title | Contract title |
| Customer | Customer name |
| Signers | Signature progress (e.g., "1/2" signed) |
| Status | Draft, Sent, Partially Signed, Completed, or Cancelled |
| Created | When the contract was created |
Search by title or customer name. Filter by status.
Creating a Contract
Click New Contract to open the creation form.
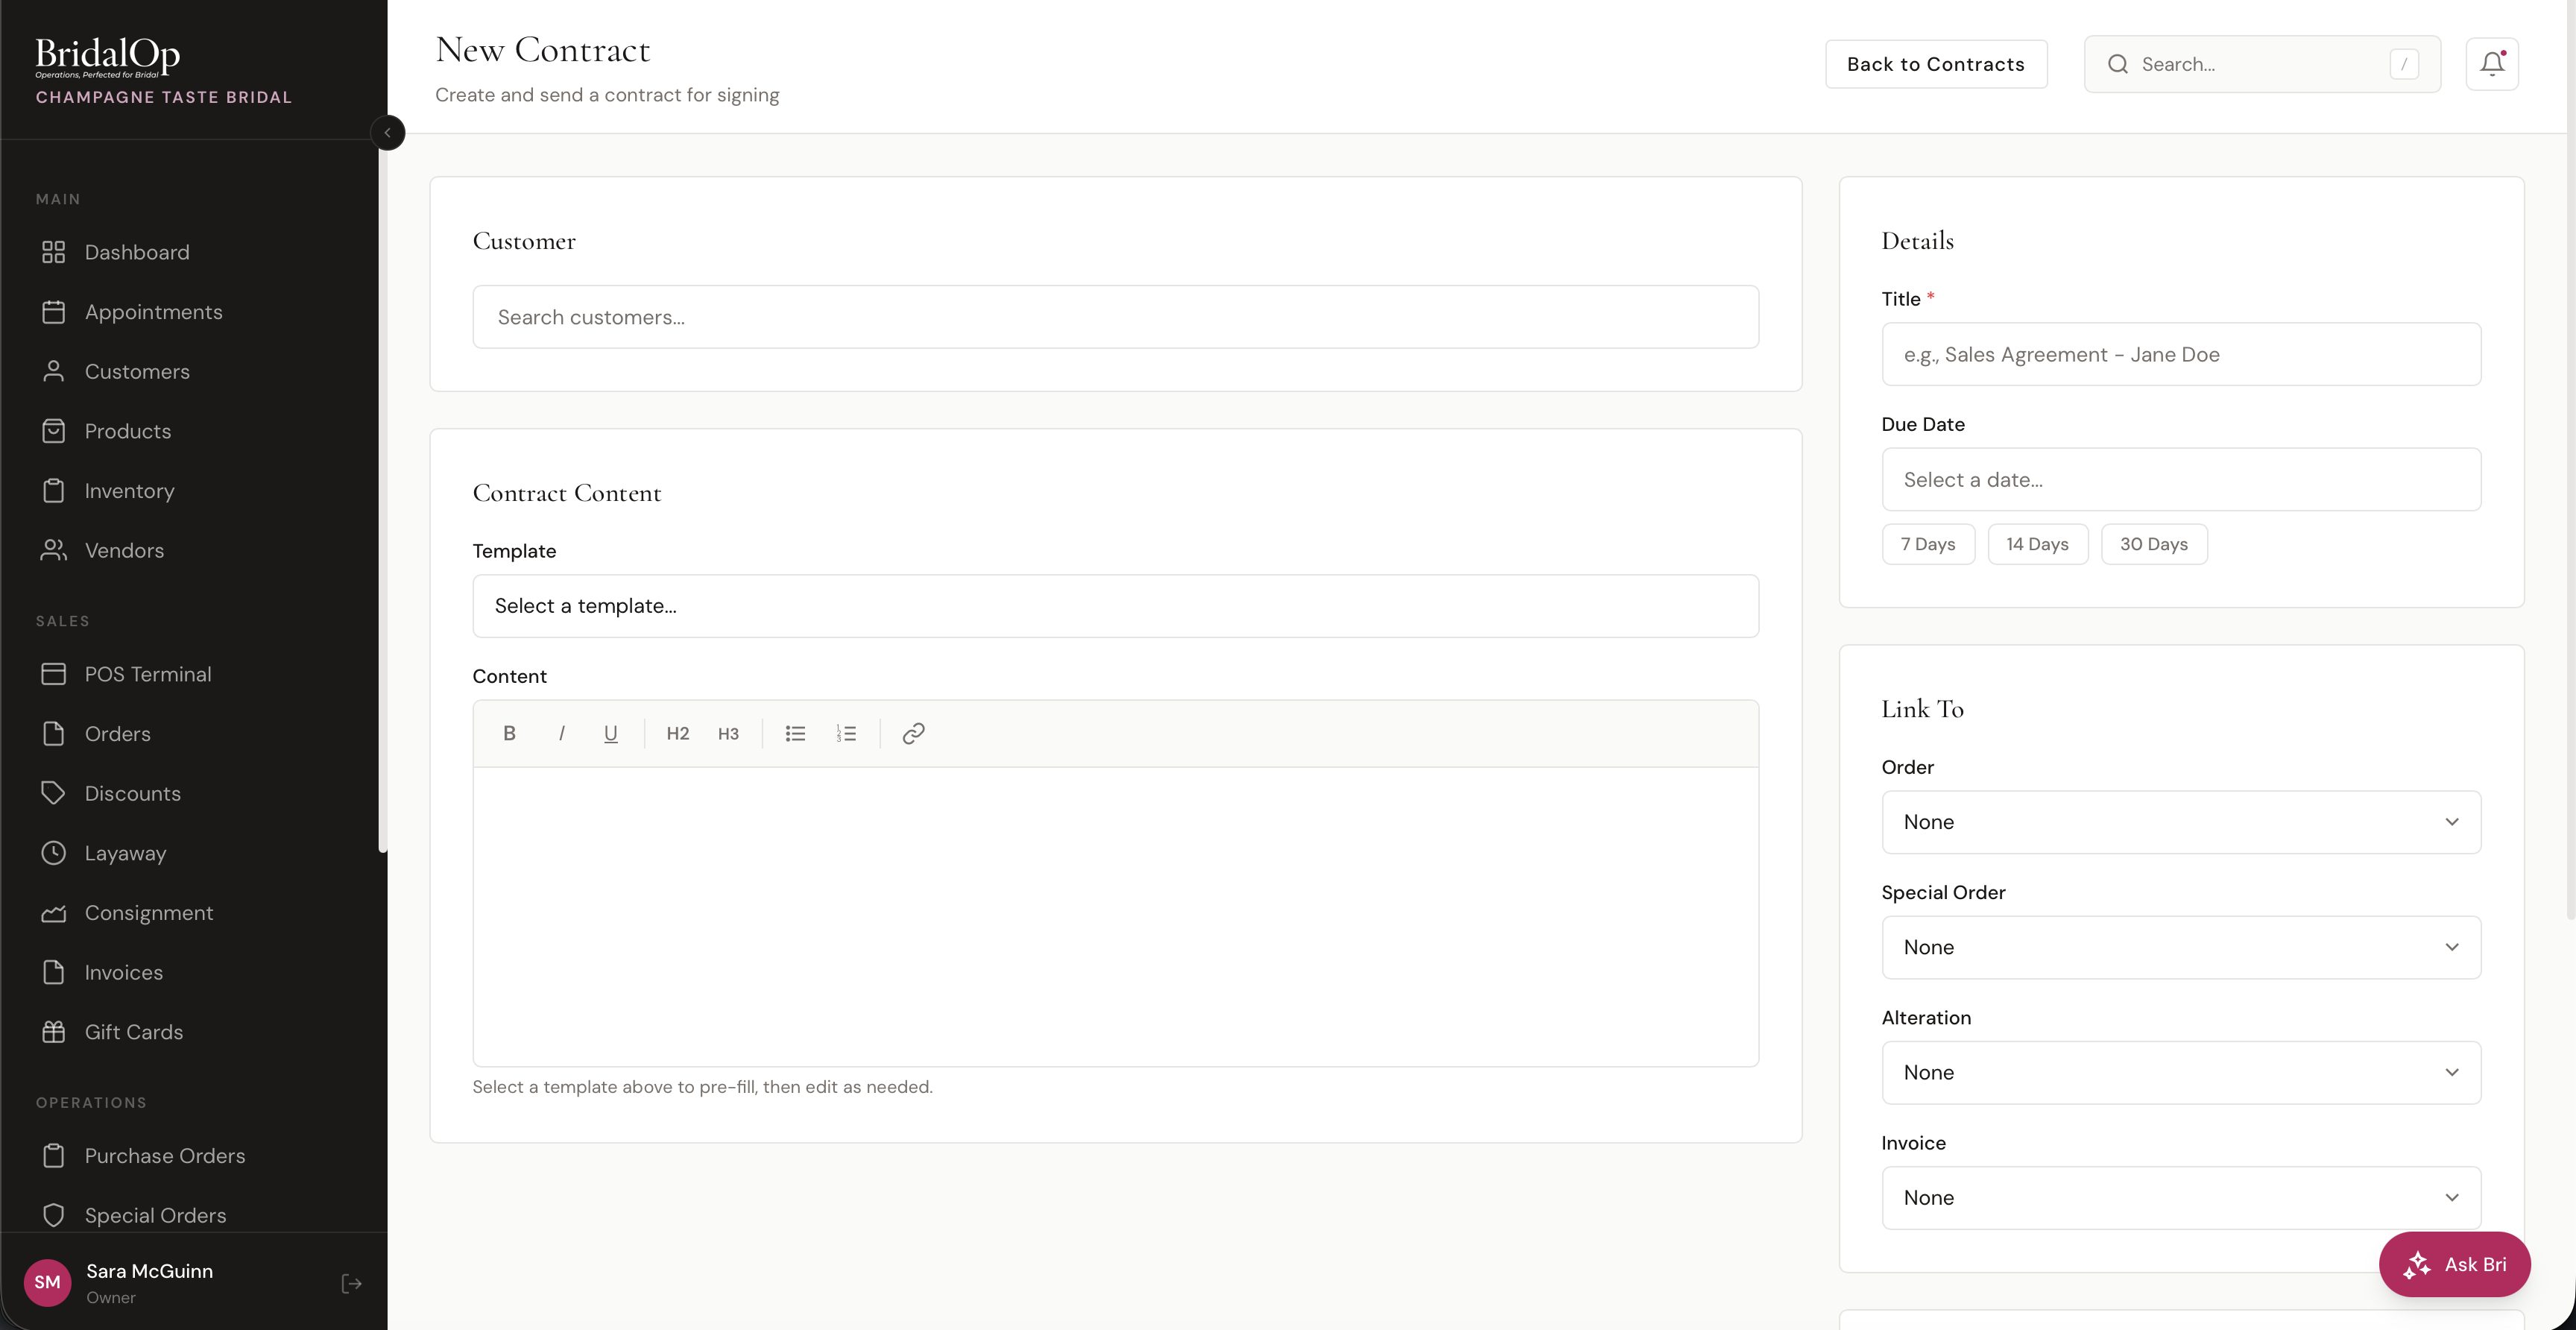
Customer
Search and select an existing customer. The customer is automatically added as the first signer.
Contract Content
- Template — select a pre-built template to pre-fill the title and content. Templates support merge tags that auto-populate with customer and order details (see Merge Tags below).
- Content — rich text editor (Bold, Italic, Underline, H2, H3, Bullet list, Numbered list, Link) for writing or customizing the contract text
Select a template to start, then edit as needed.
Details (Sidebar)
- Title (required) — contract name (e.g., "Bridal Gown — Jane Doe")
- Due Date — when the contract should be signed by, with quick buttons for 7, 14, or 30 days
Link To (Sidebar)
Optionally link the contract to related records:
- Order — link to a POS order
- Special Order — link to a special order
- Alteration — link to an alteration job
- Invoice — link to an invoice
Linked items appear on the contract detail page and on the customer's profile.
Signers
Add one or more signers to the contract. Each signer needs:
- Name
- Email — receives the signing link
- Role — Customer, Spouse, Guardian, Witness, or Other
Multiple signers are supported — the contract isn't complete until all signers have signed.
Send or Save as Draft
- Check "Send to signers immediately" — creates and emails the signing link right away
- Uncheck it — saves as Draft for review before sending
Contract Templates
Templates provide reusable contract content with dynamic merge tags. Set them up in Settings > Contract Templates.
Each template has a name, category (Sales, Consignment, Alteration, Layaway, Custom), and body with rich text content. When selected during contract creation, the template's content is rendered with merge tags replaced by actual data.
Merge Tags
Templates can include these tags that auto-fill when the contract is created:
- Customer: name, first name, email, phone, wedding date
- Store: name, location name, location address
- Order: number, total
- Invoice: number, total, deposit amount
- Special Order: SO number, product name
- Date: today's date
Contract Detail
Click any contract to view it.
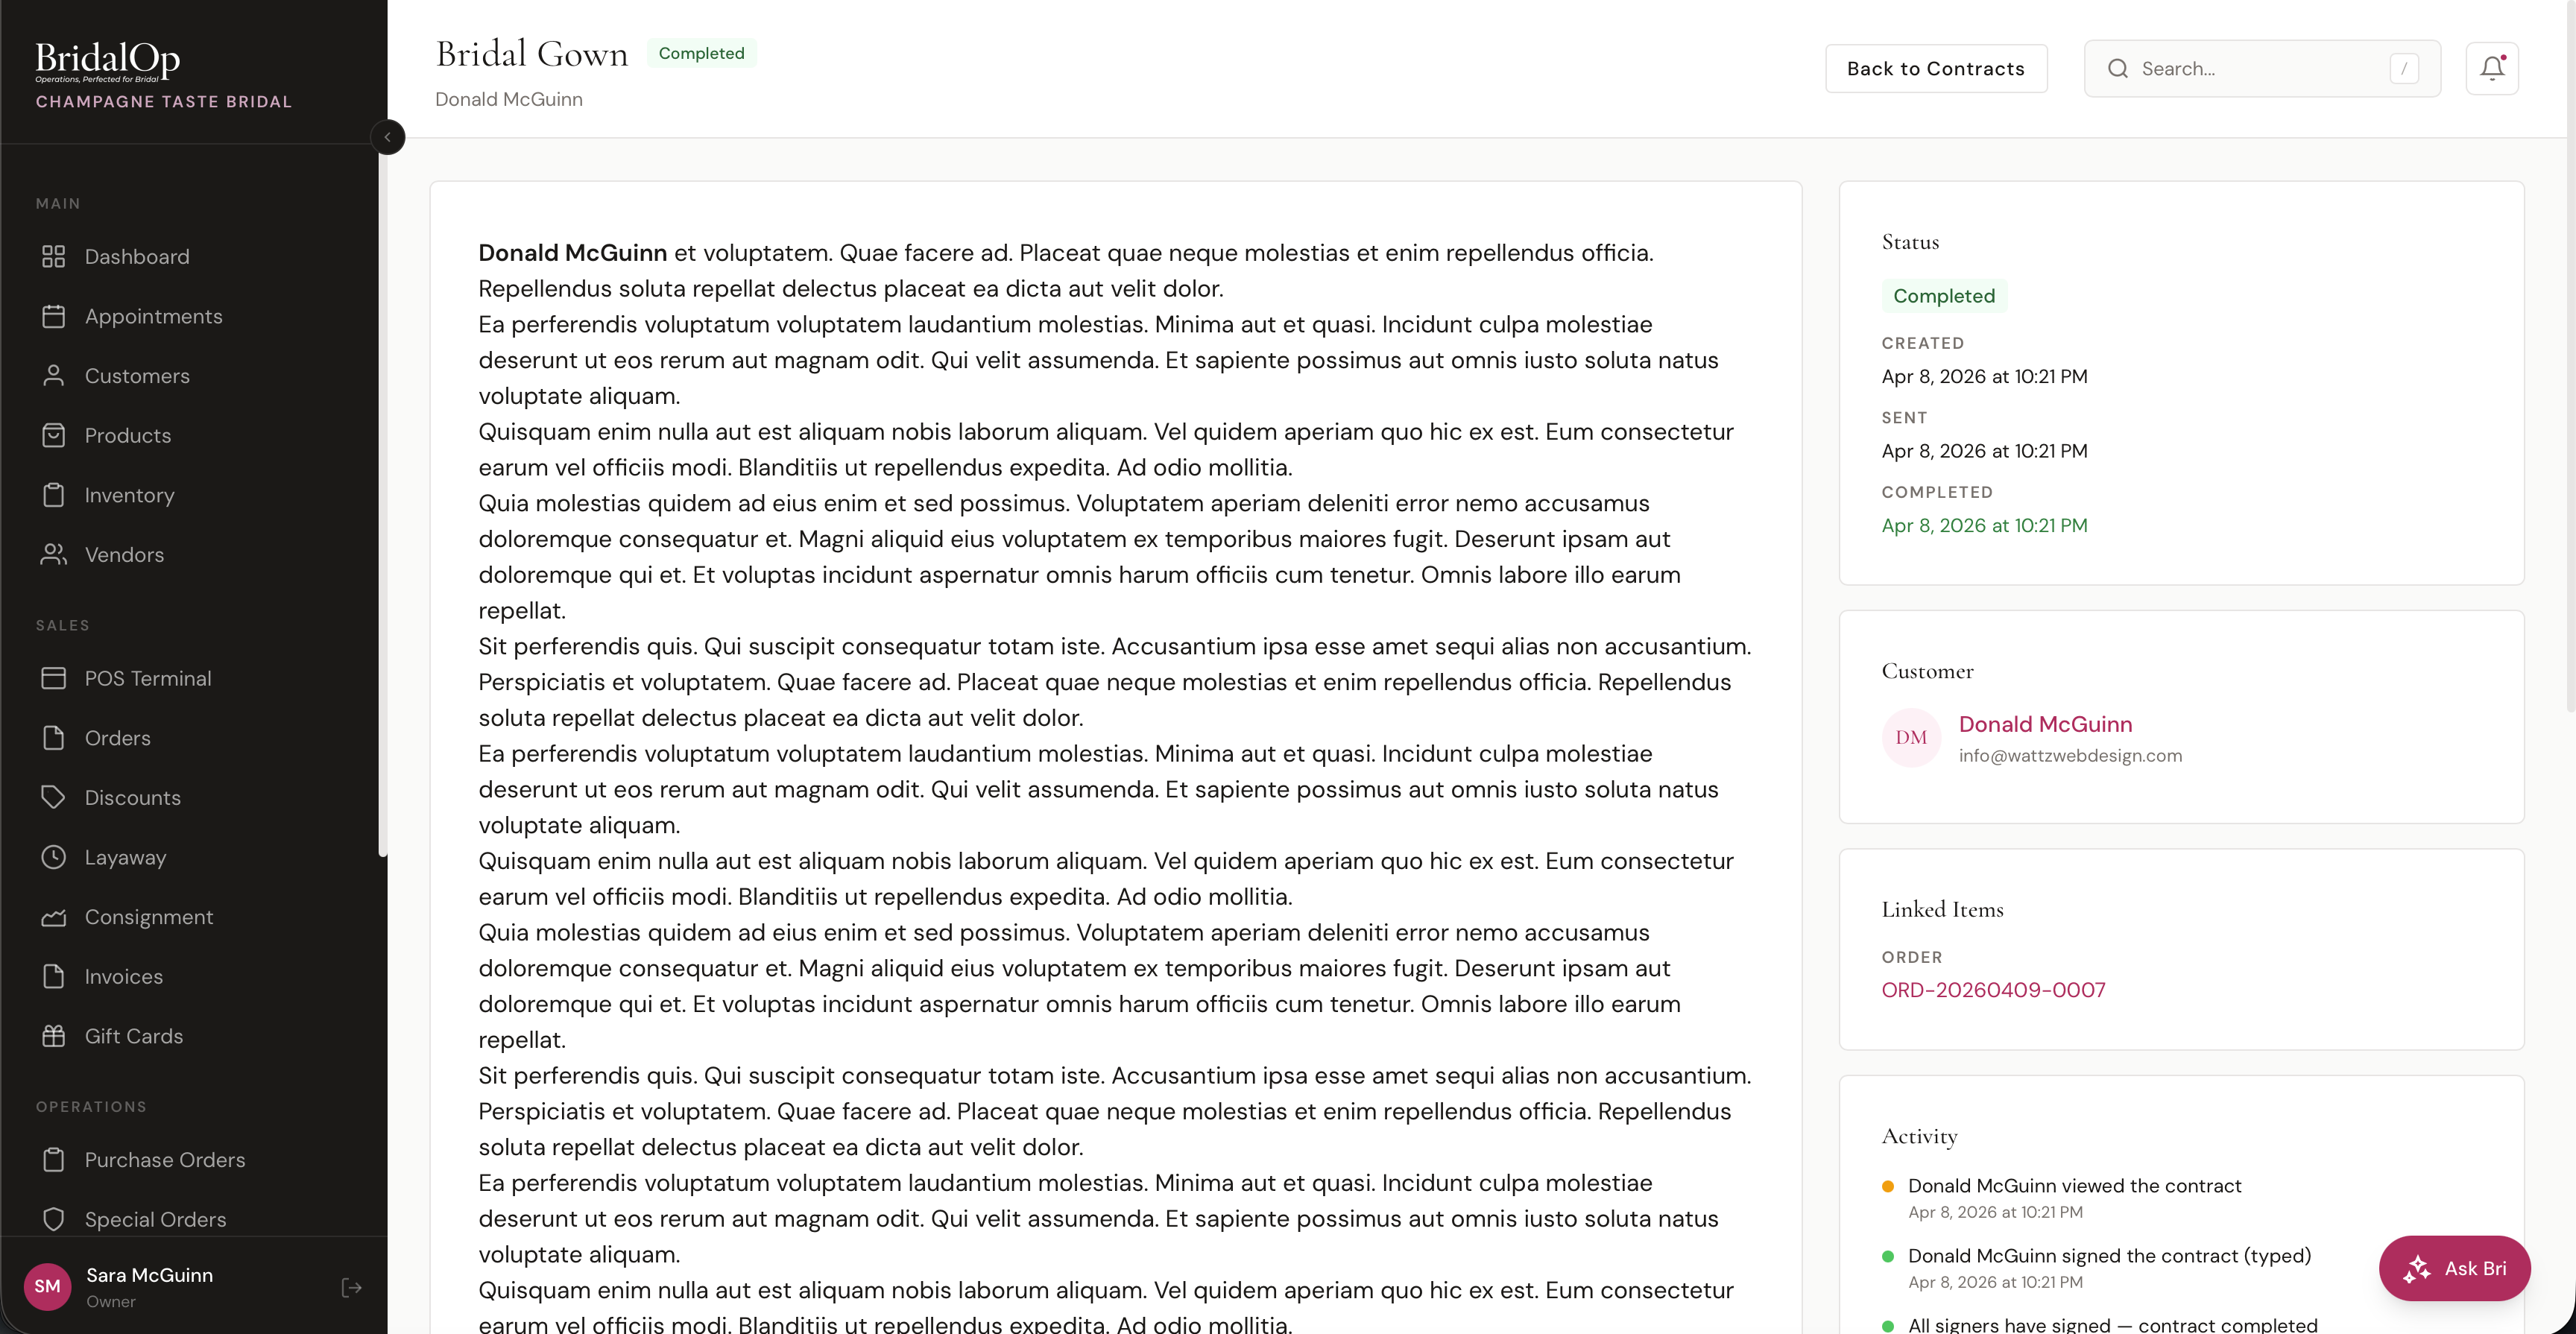
The left column shows the full rendered contract content. Below it, each signer is listed with their status (Pending or Signed) and their signature if they've signed.
Status (Sidebar)
- Status badge
- Created, Sent, and Completed timestamps
Customer (Sidebar)
Name and email linked to the customer profile.
Linked Items (Sidebar)
Shows linked Order, Special Order, Alteration, or Invoice with clickable links.
Activity Log (Sidebar)
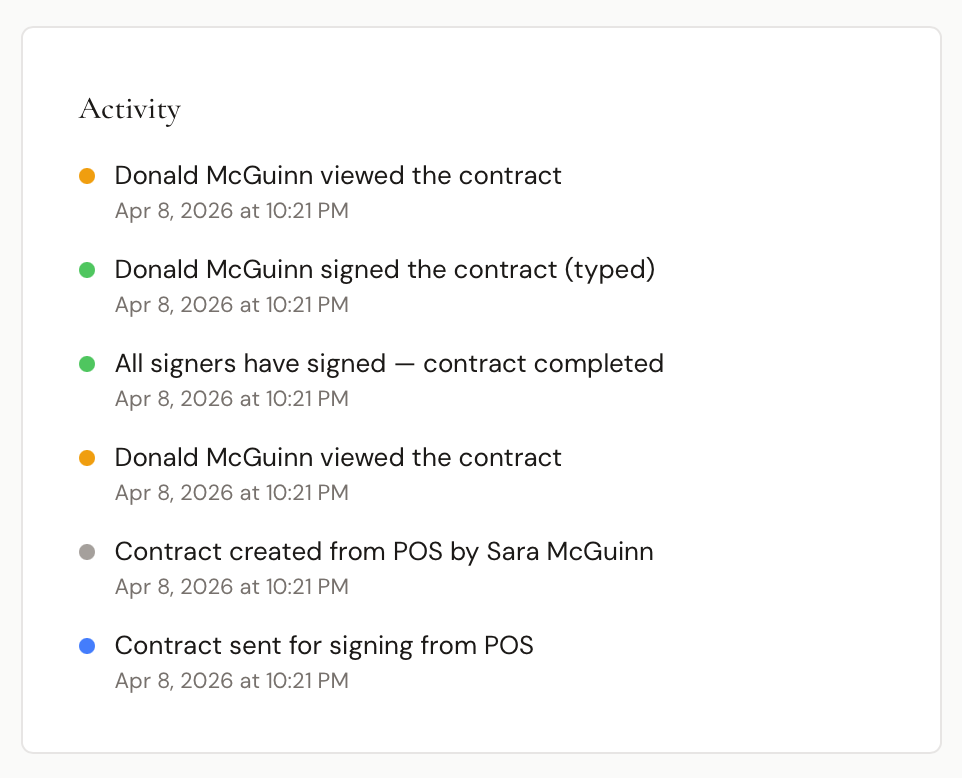
A color-coded timeline of every event:
| Event | Color | Description |
|---|---|---|
| Created | Gray | Contract created (shows who created it) |
| Sent | Blue | Contract emailed to signers |
| Viewed | Amber | Signer opened the contract |
| Signed | Green | Signer completed their signature (typed or drawn) |
| Completed | Green | All signers have signed |
| Cancelled | Red | Contract was cancelled |
Each event includes a timestamp and records the IP address for compliance.
Actions
- Send / Resend — email the signing link to all signers
- Cancel Contract — cancel the contract (cannot be undone)
How Customers Sign
When a contract is sent, each signer receives an email with a unique signing link. No login required — they click the link and see the full contract text.
Two signature options are available:
- Type Signature — type their full name, with a live preview in a handwriting-style font
- Draw Signature — draw their signature using mouse or touch on a canvas
After reviewing the contract, the signer checks "I agree to the terms above and confirm that this is my legal signature" and clicks Sign Contract.
When all signers have signed, the contract status automatically changes to Completed and a notification is sent to your store.
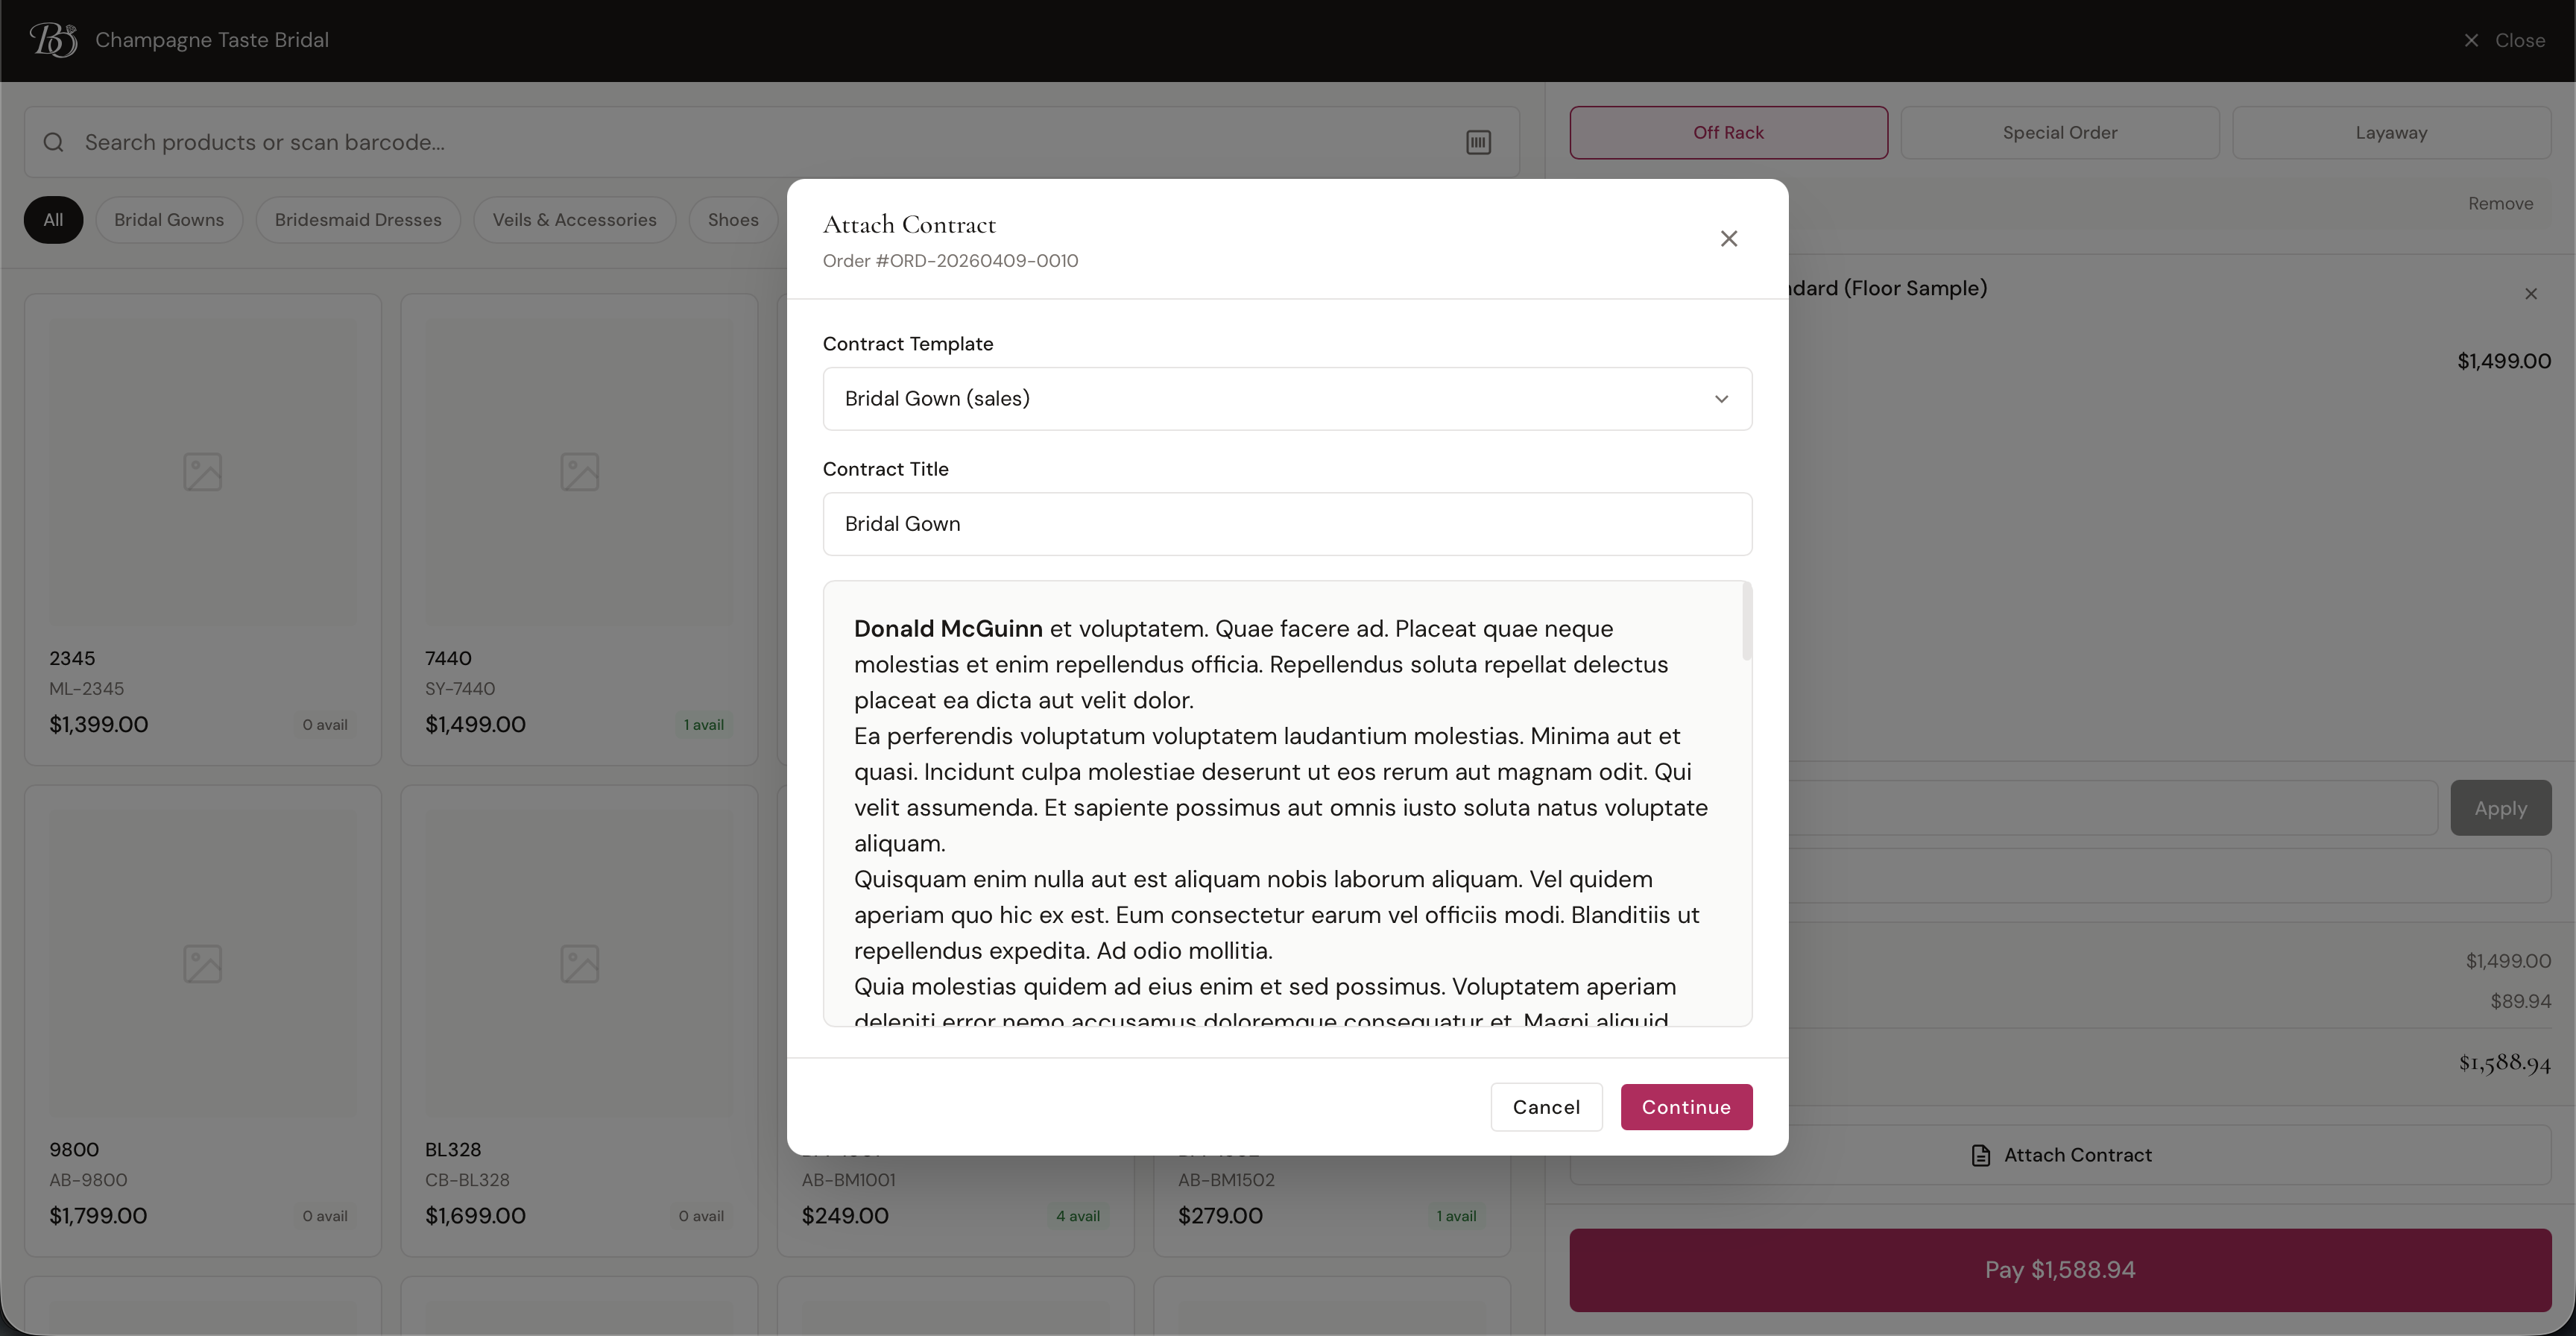
Attaching Contracts at the POS
During checkout in the POS Terminal, click Attach Contract below the order totals.
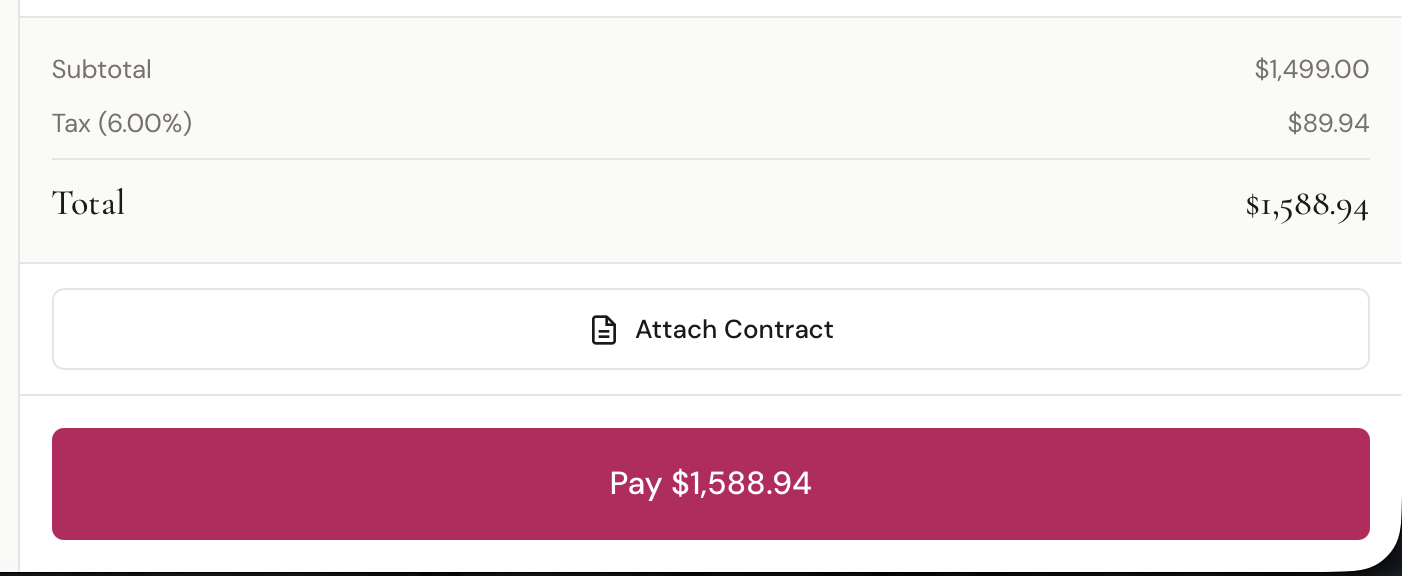
Step 1: Select Template & Review
A modal opens where you select a Contract Template and customize the title. The contract content is previewed with all merge tags filled in (customer name, order number, etc.).
Step 2: Sign or Send
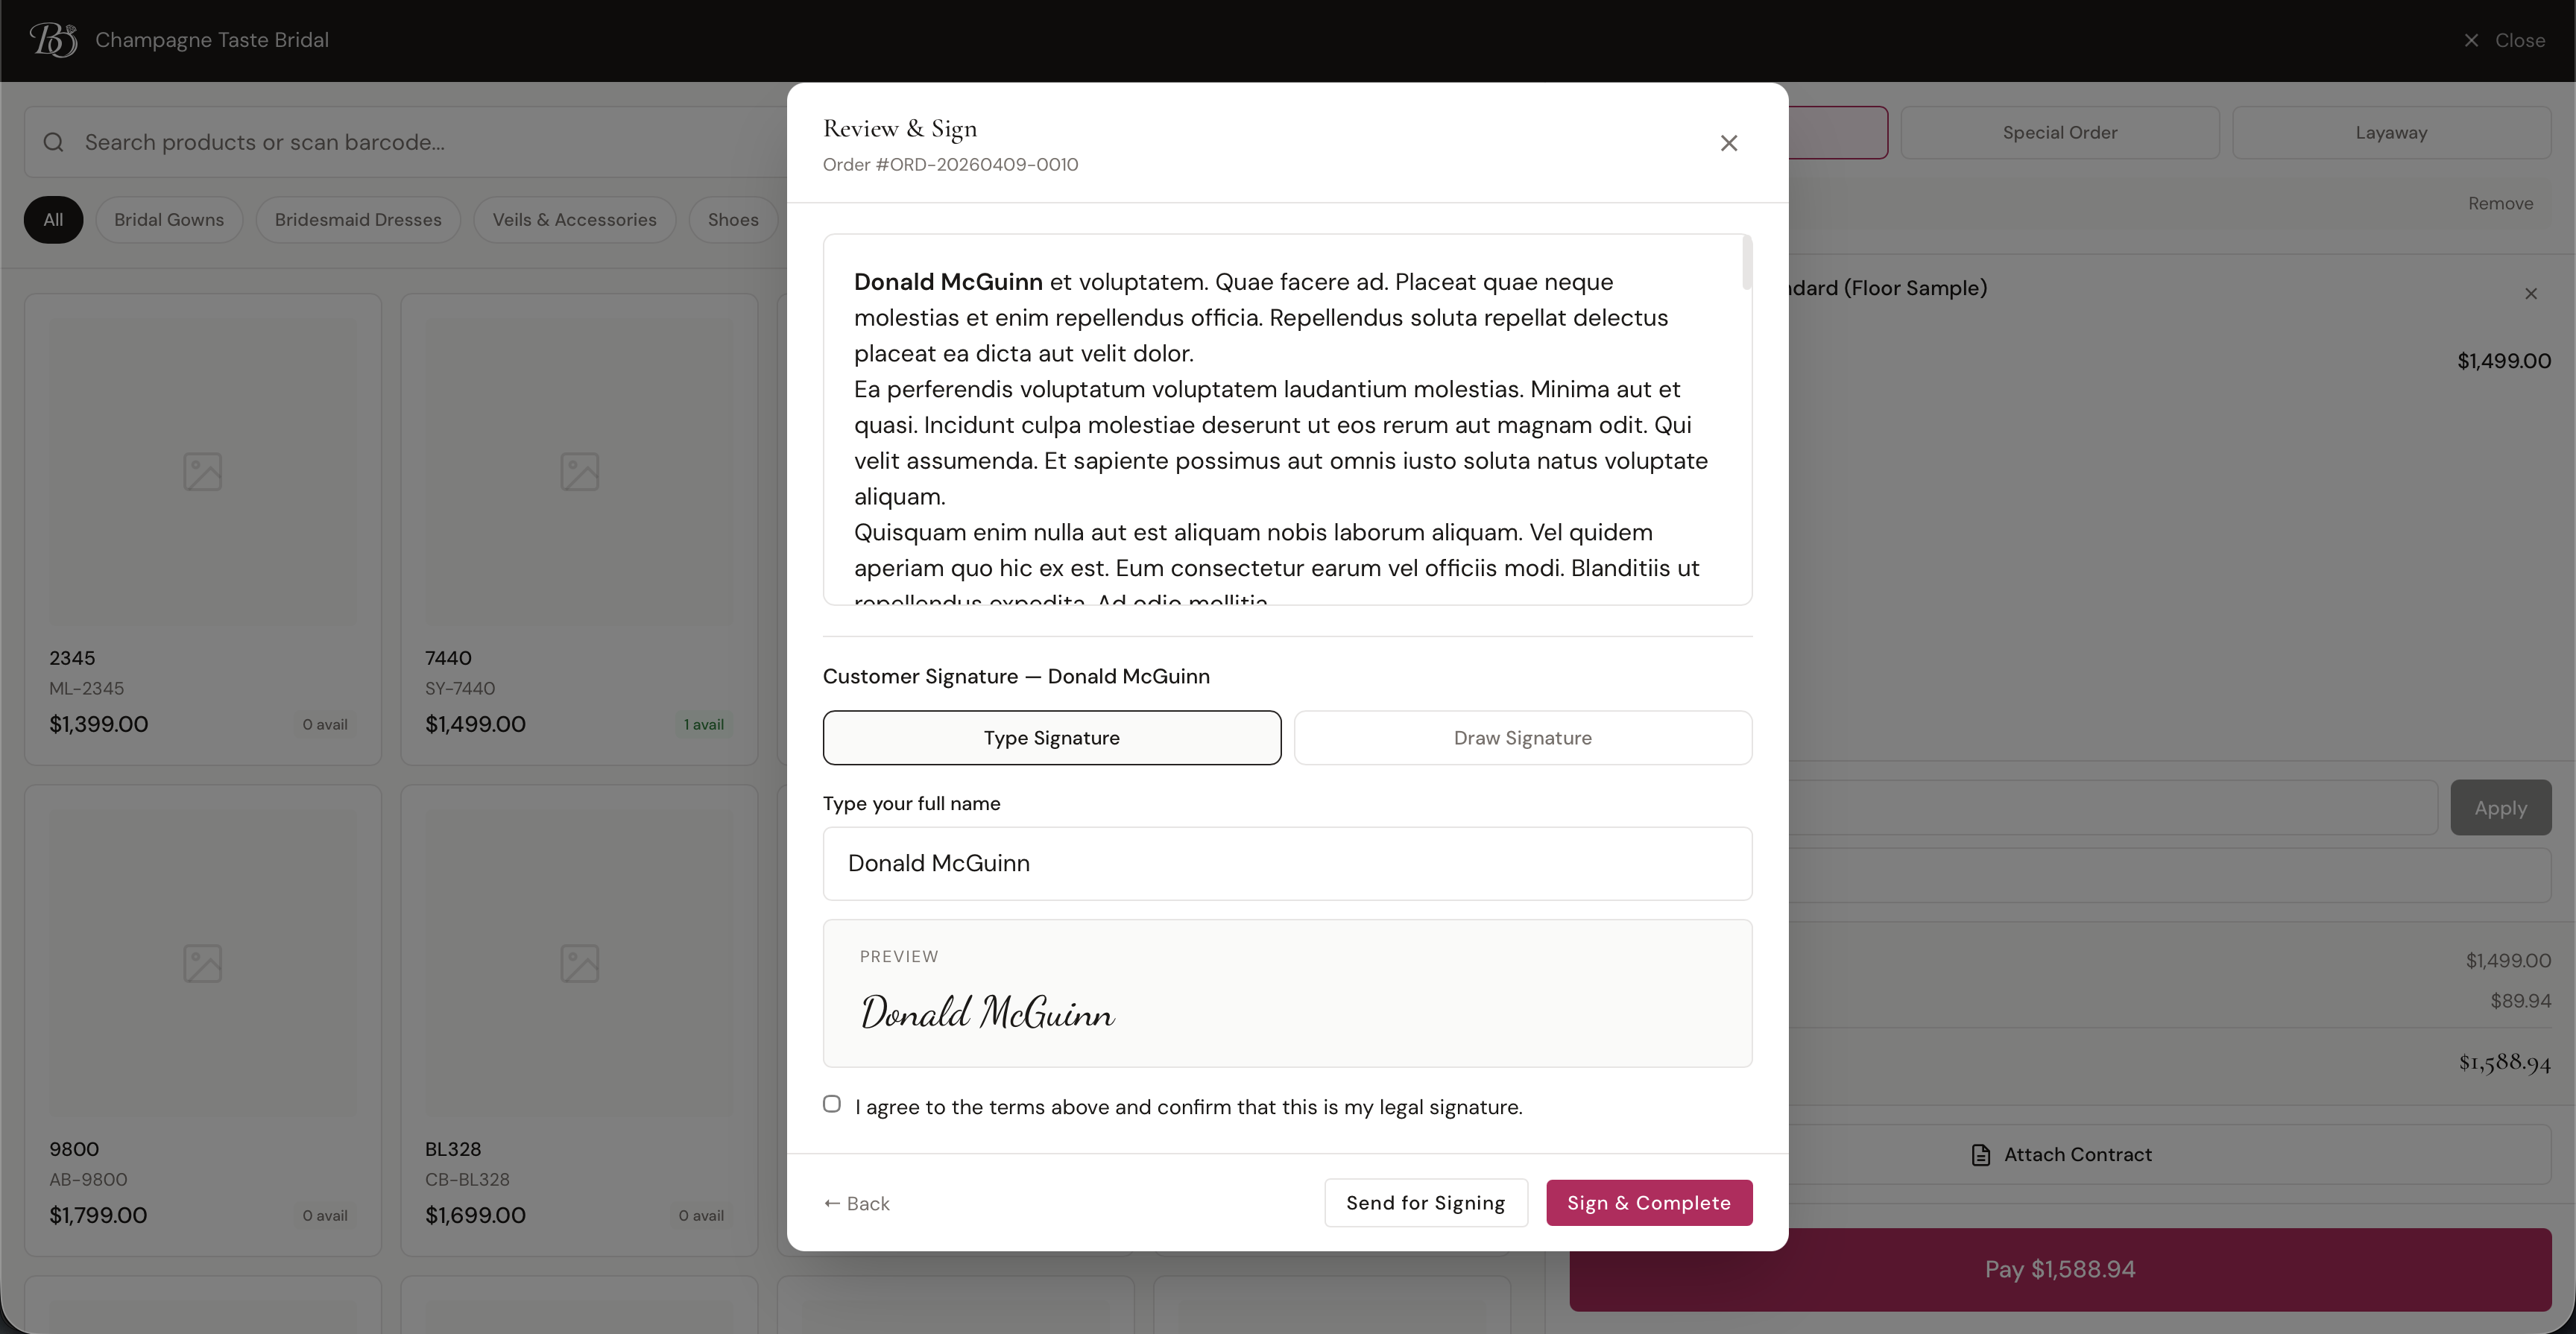
The customer reviews the contract and signs using either Type Signature or Draw Signature. Then choose:
- Sign & Complete — the customer signs right now on the device (e.g., tablet at the counter). The contract is immediately completed.
- Send for Signing — creates the contract and emails the signing link. The customer can sign later from their phone or computer.
The contract is automatically linked to the current order.
Contract Statuses
| Status | Meaning |
|---|---|
| Draft | Created but not sent to signers |
| Sent | Signing links emailed to all signers |
| Partially Signed | At least one signer has signed, but not all |
| Completed | All signers have signed |
| Cancelled | Contract was cancelled |
Viewing Customer Contracts
You can view all contracts for a specific customer on their profile under the Contracts tab. This shows every contract's title, date, signature progress, and status.