

Appearance
Staff
Manage your team from the Staff section — invite new members, assign roles, track time clock entries, and configure commissions.
Staff List
The main Staff page shows all team members in a searchable table.
| Column | Description |
|---|---|
| Name | Staff member's name with avatar |
| Email address | |
| Role | Color-coded role badge |
| Location | Assigned boutique location |
| Status | Active, Inactive, or Invite Pending |
Filters
- Search — filter by name or email
- Status — Active (the default), All, or Inactive. People who have left drop out of view unless you ask for them.
Staff who haven't accepted their invitation yet show an Invite Pending badge in amber. You can click Resend to send them a new invitation email.
Inviting a New Staff Member
Click Invite Staff to open the invitation form.
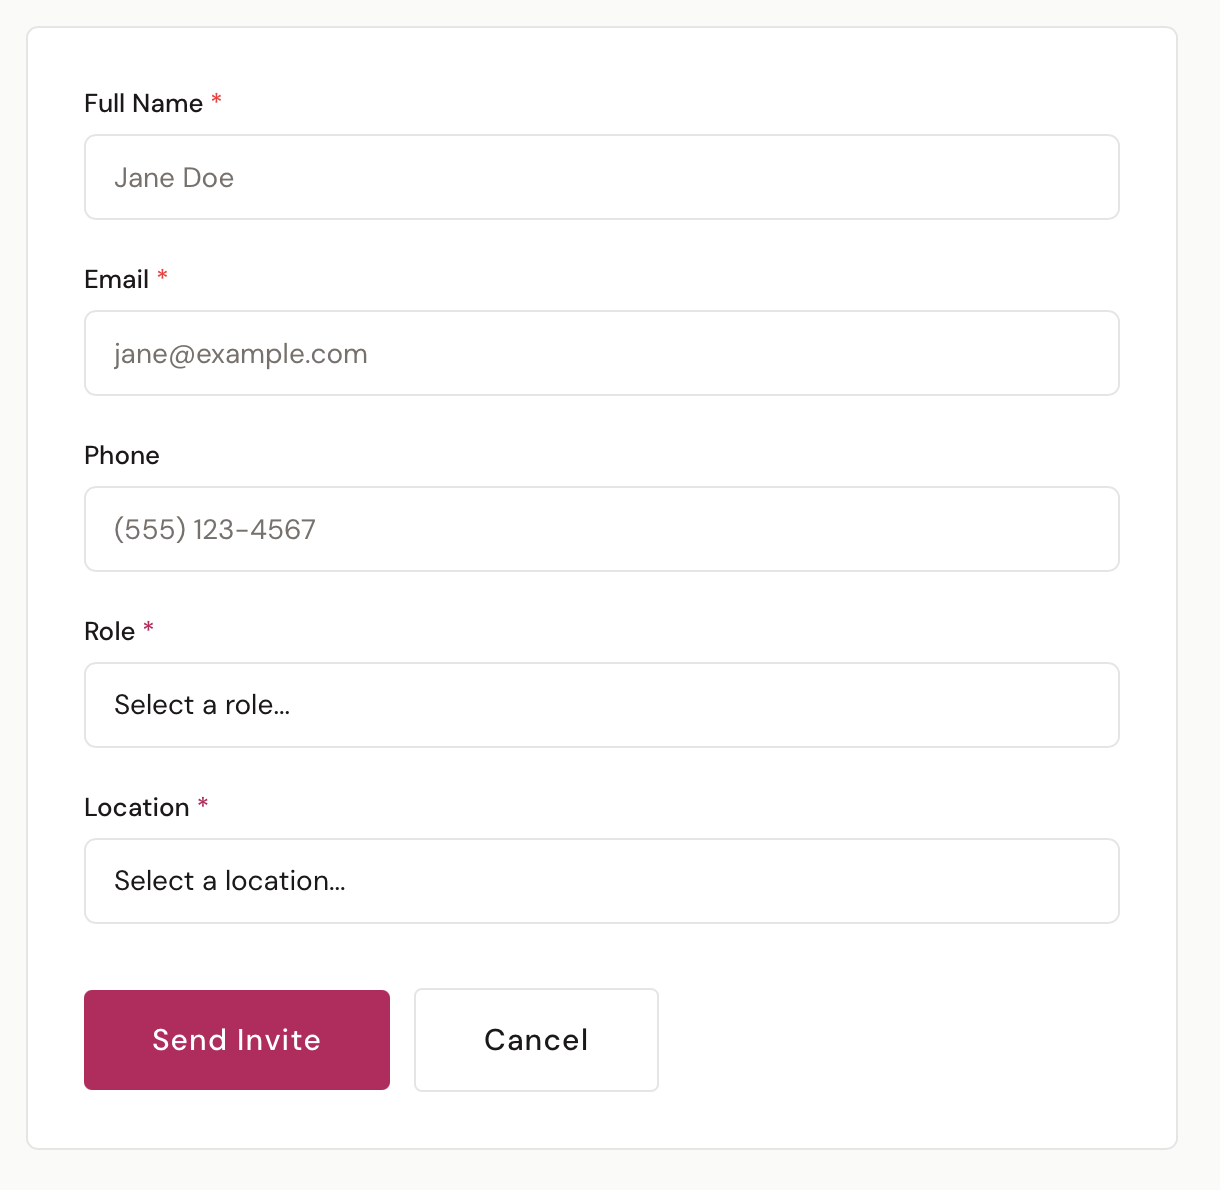
Fields
| Field | Required | Description |
|---|---|---|
| Full Name | Yes | Staff member's name |
| Yes | Must be unique — the invitation is sent here | |
| Phone | No | Phone number |
| Role | Yes | Manager, Accountant, Consultant, Tailor, or Receptionist (owners can also grant Owner) |
| Location | Yes | Which boutique location they belong to |
Click Send Invite to create the staff account and email the invitation.
Invitation Email
The new staff member receives an email with your boutique's logo, their assigned role, and a "Set Up Your Account" button.
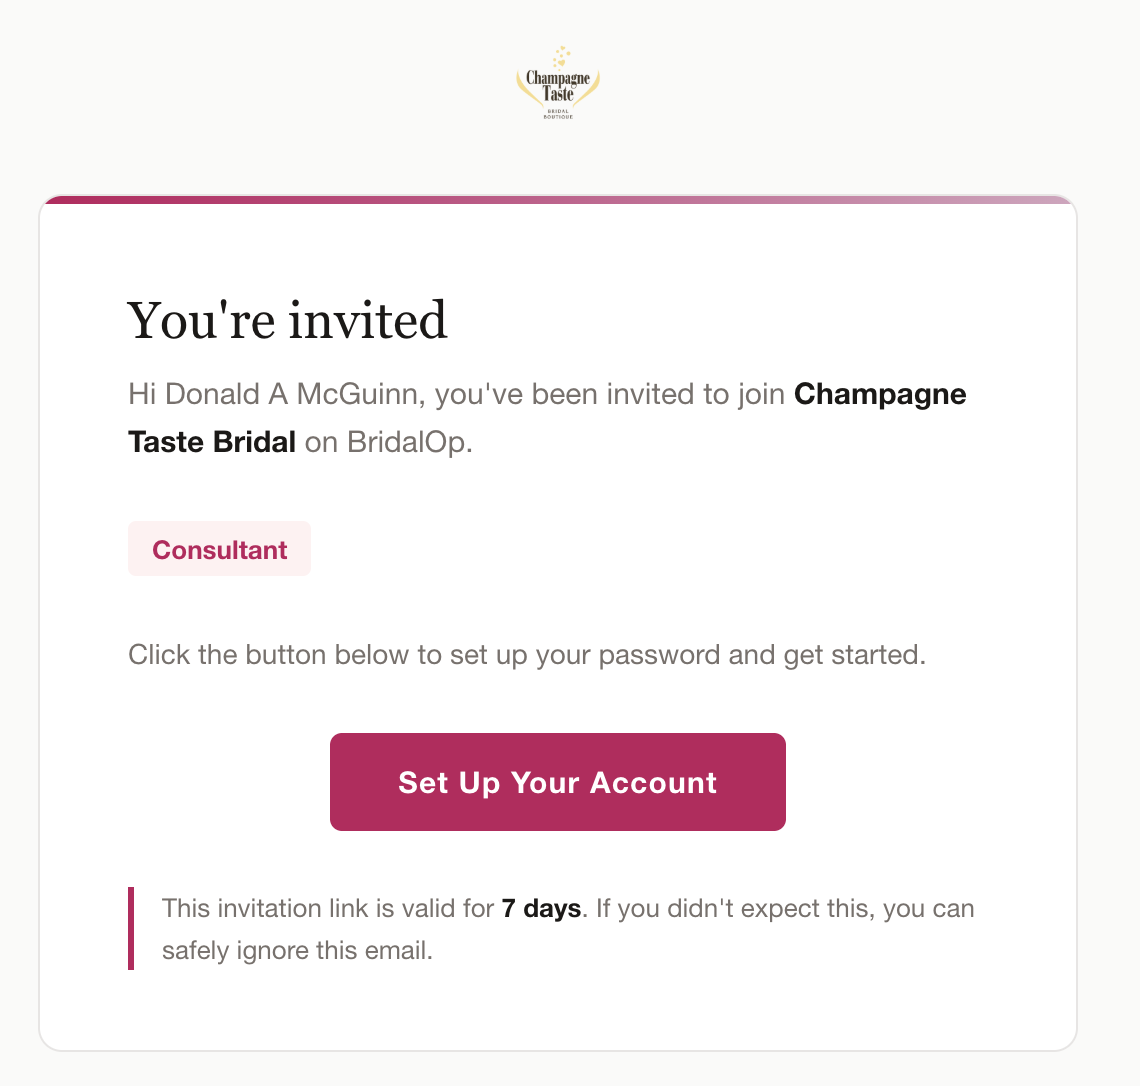
The invitation link is valid for 7 days. If it expires or the staff member didn't receive it, click Resend from the staff list to generate a fresh link.
Accepting the Invitation
When the staff member clicks the link, they set up their account:
- Name — pre-filled, can be edited
- Password — minimum 8 characters, must confirm
- Time Clock PIN — optional 4-digit PIN for the Time Clock
After completing setup, they're automatically logged in and taken to the dashboard.
Roles
Each staff member is assigned a role that controls what they can access in BridalOp.
| Role | Access |
|---|---|
| Owner | Full access to everything — cannot be deactivated or changed |
| Manager | Full access to everything |
| Accountant | Read-only financial visibility — all reports plus view access to orders, invoices, layaway, consignment, gift cards, discounts, purchase orders, customers, products, inventory, and vendors. No create/edit/delete and no settings access. See Roles & Permissions. |
| Consultant | Appointments, customers, inventory (view), POS, orders, alterations, time clock |
| Tailor | Alterations, customers, inventory (view), time clock |
| Receptionist | Appointments, customers, POS, orders, time clock |
Multiple Owners
You can assign the Owner role to more than one team member — useful for co-owners or a partner who needs unrestricted access. Only an existing owner can grant the Owner role (a manager can't promote anyone, including themselves, to Owner). Every owner keeps full, unmodifiable access and cannot be deactivated.
Staff Profile
Click any staff member in the list to view their profile.
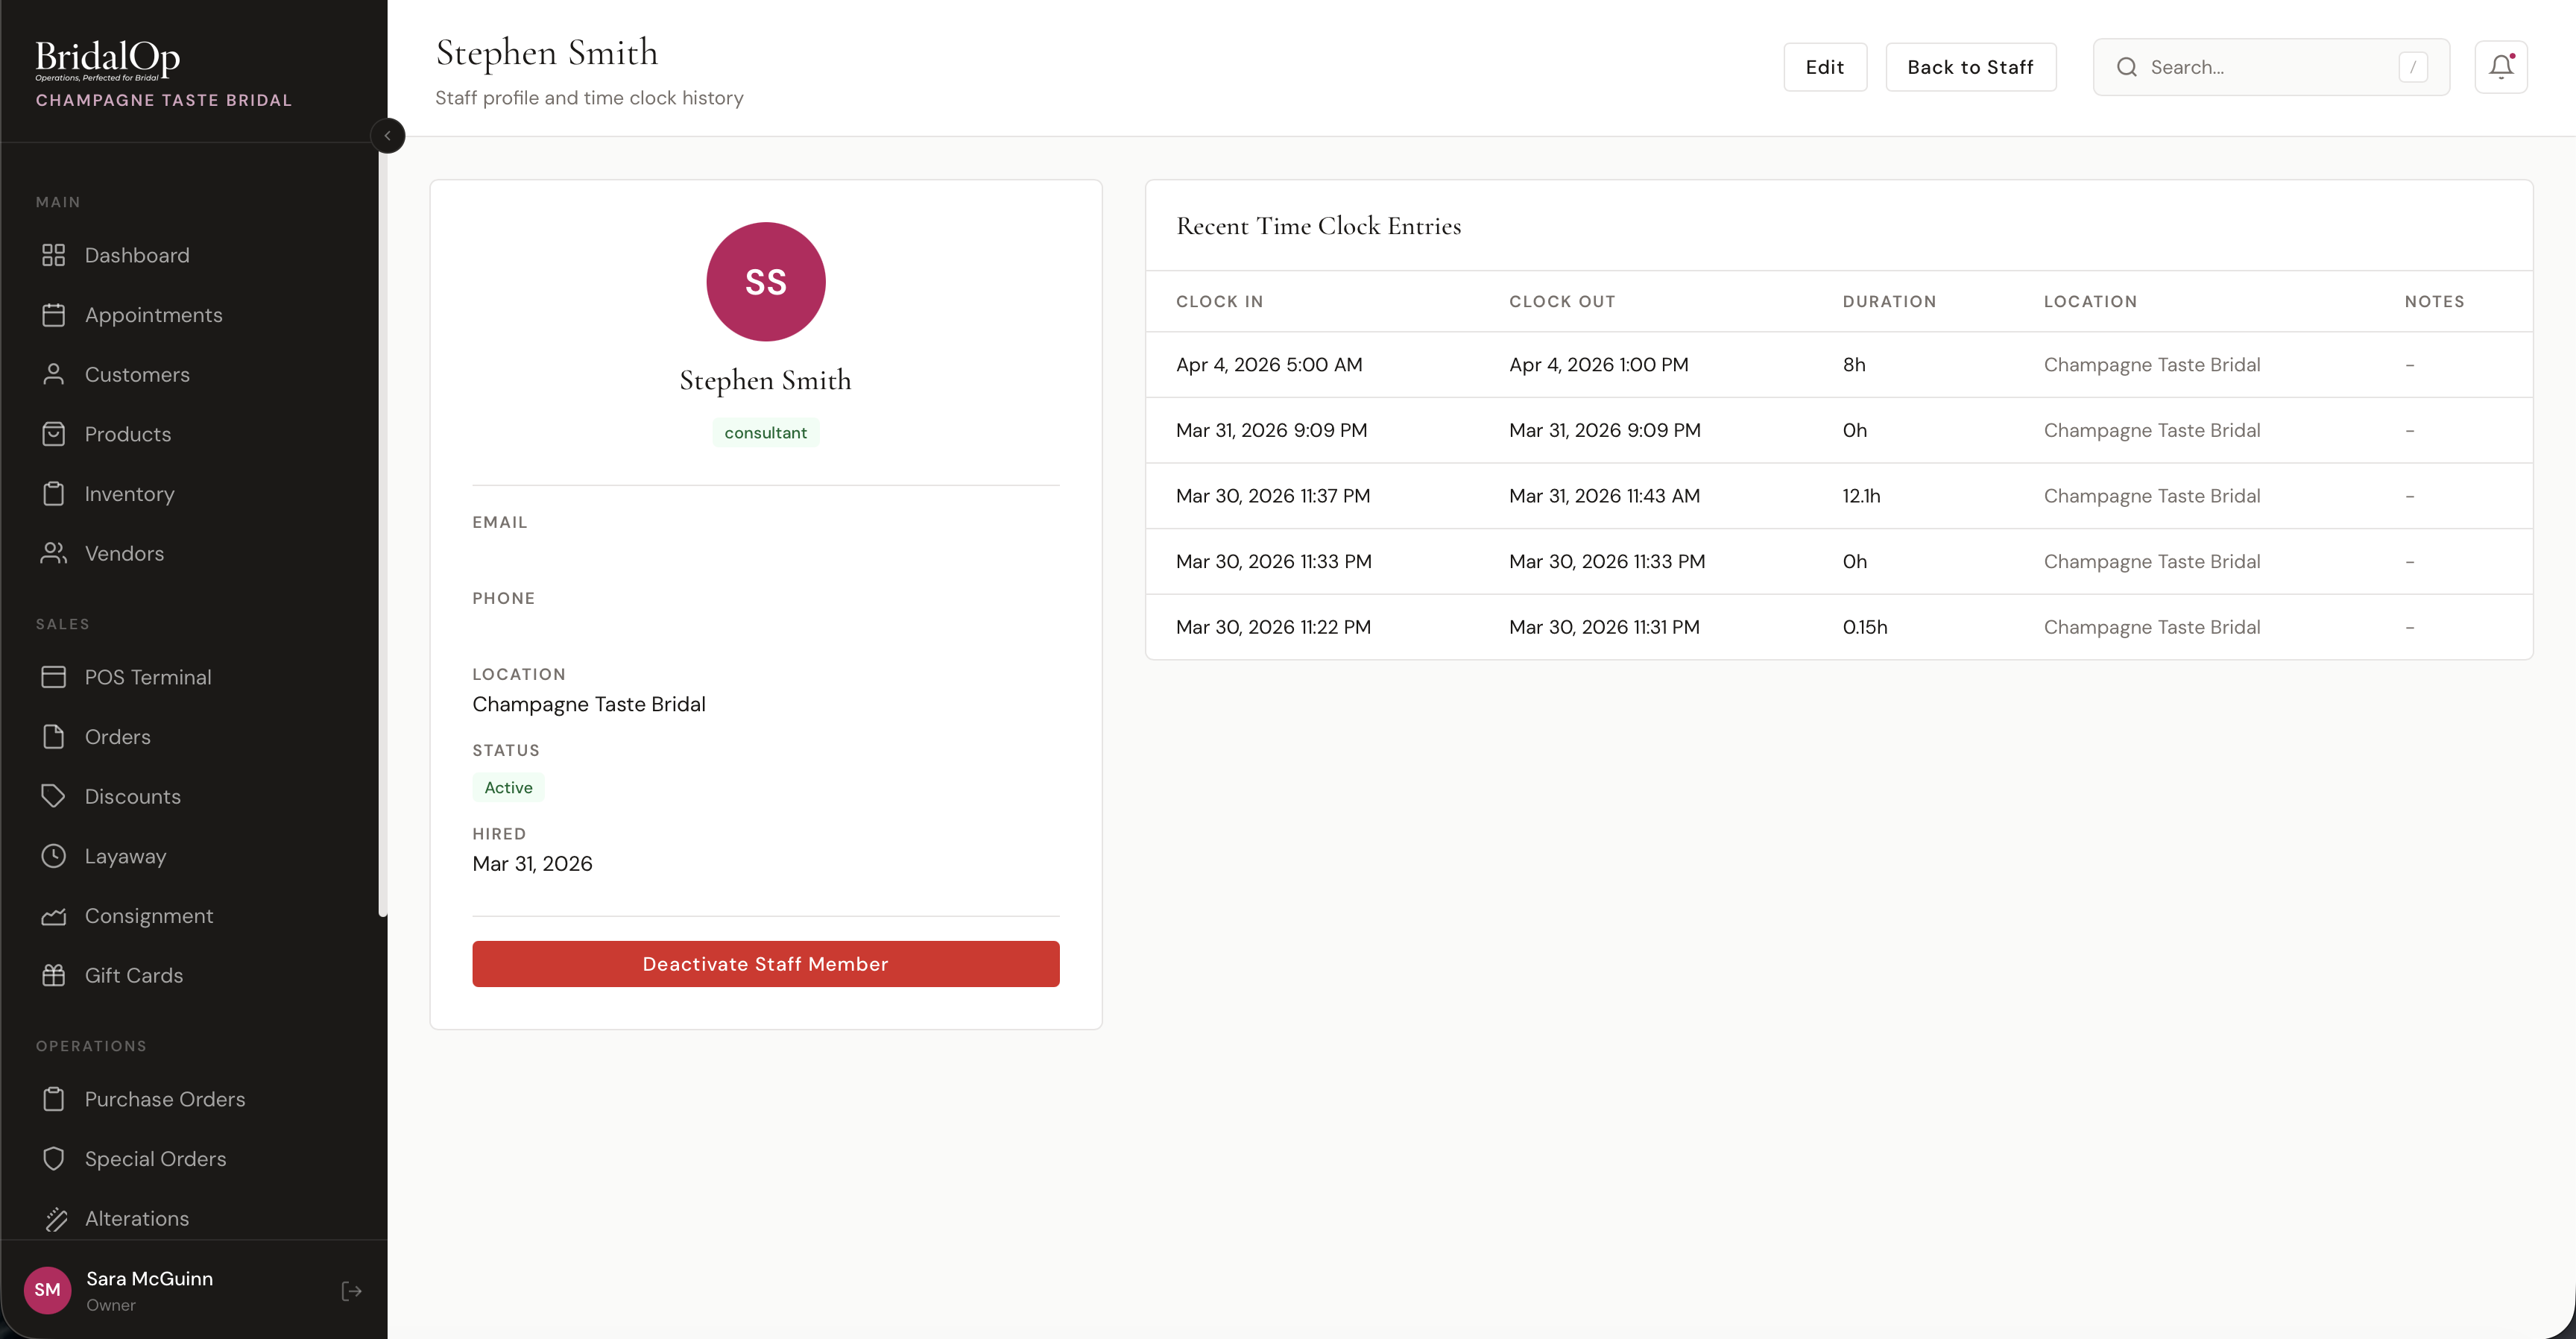
Profile Card
The left side shows:
- Avatar with initials
- Name and role badge
- Email and phone
- Location
- Status — Active or Inactive
- Hired date
- Deactivate Staff Member button (not available for owners)
If the staff member hasn't accepted their invitation, an amber alert shows "Invite pending" with a Resend Invite button.
Recent Time Clock Entries
The right side shows the staff member's most recent time clock entries:
| Column | Description |
|---|---|
| Clock In | Date and time clocked in |
| Clock Out | Date and time clocked out (or "Active" badge if still on the clock) |
| Duration | Hours worked |
| Location | Where they clocked in |
| Notes | Any notes on the entry |
Editing a Staff Member
Click Edit from the profile page to update:
| Field | Description |
|---|---|
| Phone | Phone number |
| Role | Change their role (cannot change the owner's role) |
| Location | Reassign to a different location |
| Status | Active or Inactive |
| Time Clock PIN | 4-digit PIN — leave blank to keep the current one |
| Commission Rate % | Percentage for commission tracking (0–100). A fallback — see Commissions for per-category rates and monthly tiers |
| Customers can pick them when booking | Offers them as a stylist on your booking page. See Preferred stylist |
Name and email are displayed but cannot be changed from this page.
Deactivating & Reactivating
Deactivating is how you archive someone who has left. Click Deactivate Staff Member on their profile.
Deactivated staff:
- Cannot sign in. They're told the account is no longer active rather than given a wrong-password message, so nobody wastes time resetting a password that was never the problem.
- Are signed out if they're already in. Checked on every request, not just at login — a session lasts a fortnight, so somebody let go on a Tuesday afternoon shouldn't still be in the system on Wednesday.
- Are marked Inactive with a termination date.
- Drop out of the staff list, which shows current staff by default. All and Inactive are a click away.
They are not deleted, and deleting them is not recommended: their sales, commission and hours stay attached to them, so your past reports keep adding up. Archived means out of the way and locked out, not gone.
If a team member works at more than one of your boutiques, each account is separate. Being let go from one doesn't touch the other.
To reactivate, go to their Edit page and set their status back to Active. This restores access and clears the termination date.
The Owner role cannot be deactivated.
If you have staff who left before 31 August 2026
Deactivating previously removed people from lists but did not revoke their login. If anyone left and was never deactivated, doing it now is what actually ends their access.
Account Access (Cross-Tenant Grants)
Below the staff list — visible to owners only — sits an Account Access card. This is a separate concept from inviting a regular staff member: it lets you give another existing BridalOp account the ability to switch into your account with full administrator access, while they keep their own home tenant.
The most common use case is bringing in a trusted outsider (a consultant, an accountant, or a multi-store owner who runs another boutique on BridalOp) without forcing them to log out of their own account every time.
Switching between boutiques
Once you have access to more than one, the switcher sits at the bottom of the sidebar on a computer, and at the top of the More sheet on a phone — tap More in the bottom bar.
There are two ways to end up with more than one boutique, and both appear in the same place:
- A grant, as described above — someone gave you access to their account.
- One email, two accounts. If you own two boutiques you'll have a separate login at each, on the same email address. Signing in asks which one you want, and Switch store moves between them afterwards.
Treat this like sharing a master key
Anyone you grant access to gets full owner-equivalent permissions — they can see every customer, every transaction, and every setting, and make changes. Only grant access to people you trust completely.
Granting Access
- Click Grant Access in the Account Access card header.
- Enter the email address of the person you want to invite. They must already have a BridalOp account — if they don't, ask them to sign up first, then re-send the invite.
- Click Send Invitation.
BridalOp sends them both an email invitation and an in-app notification (delivered to the bell on their own home account). The invitation includes a one-click accept link.
A few things BridalOp won't let you do:
- Grant access to yourself
- Grant access to someone who's already a member of your account (they already have full access via their normal login)
- Send a duplicate invite while one is still pending
Status, Revoke, and Self-Revoke
Each row in the Account Access list shows the invitee's name + email, who invited them, and a status badge:
| Badge | Meaning |
|---|---|
| Pending (amber) | Invitation sent but not yet accepted |
| Active (green) | Accepted — the invitee can now switch into your account |
Click Revoke at the right of any row to immediately cut off access. The invitee themselves can also self-revoke from their own account at any time.
What the Invitee Sees
After accepting the invitation (they have to be signed in as the invited email — clicking the link from the wrong account will redirect them with an error), the granting boutique appears in the account switcher at the bottom of their sidebar. Clicking your boutique's name in that switcher swaps their session into your account with full admin access. Clicking their own boutique name swaps them back.
If they were currently switched into your account when you (or they) revoke access, BridalOp drops them back to their home account immediately.
Multi-Store Team Members
A person can be a staff member at more than one BridalOp boutique using the same email and password — for example, someone who works at two locations that each run their own BridalOp account, or an owner who runs multiple stores. Each boutique invites and manages them independently, so their role and location can differ from store to store.
This is different from Account Access
Account Access grants an existing outside account full owner-level access to switch into your books. Multi-store membership is when the same person is a real staff member (with their own role) at several boutiques, all under one email and password.
"Choose Your Store" at Login
When a team member signs in with an email and password that match staff accounts at more than one boutique, BridalOp adds a "Choose your store" step after sign-in:
- Each account is listed by boutique name and location (if set).
- They pick the store they want to work in, and BridalOp signs them into that account.
Staff who belong to only one boutique never see this step — they go straight to the dashboard.
Switching Stores Without Logging Out
Once signed in, a multi-store team member sees a Switch store link near the bottom of the sidebar. Clicking it reopens the same store picker so they can jump to another of their boutiques without signing out and back in.
- The current store is marked Current and can't be re-selected.
- Switching lands them on the dashboard of the chosen store.
- Because all of their stores were verified with the same password at login, no re-entry of credentials is needed for the rest of the session. Signing out clears the list, so the next login starts fresh.
My Profile
Every staff member can edit their own profile (name, phone, time clock PIN, and personal Google Calendar connection) by clicking their name in the bottom-left corner of the sidebar. See My Profile for details.